This page logs my setup and ongoing experimentation for development of 'Internet of Things'.
The information is frequently 'borrowed' from other web sources (hopefully with
proper acknowledgement) and may change as my experience advances.
It does not claim to be up to my normal Professional Engineering standards,
but is just for experimentation in what is a 'very exciting field'.
Communication with 'Things': PROTOCOL CHOICE:
Creating 'Internet Devices' that respond to incoming HTML requests is quite
straightforward, but creating devices that operate and report as they 'have a need to' is much harder.
The following very good explanation is just a partial copy of the Adafruit
page ... Adafruit Learn
What about HTTP (REST)?
Chances are you're familiar with HTTP - its used for every website. HTTP is stateless, so you have to have a connection per data transfer - one connection every time you want to write data, one connection for reading. HTTP is great for huge amounts of data such as used for websites, and it can be used for IoT connections. But it's not lightweight and its not terribly fast.
Another problem with HTTP is that it's pull only - your toaster can only send data to the server whenever it wants (e.g. "Toast is done!"). If it wants to pull data from the server, it has to constantly connect and ask ("Any updates to the Toast darkness level?" "What about now?" "Anything now?") which is really data and time consuming. Pull updates are either slow (check only every few minutes) or data/power intensive (check constantly)

|
HTML Control
|
MQTT! So E-Z!
For that reason, MQTT is a great protocol. It's extremely simple, and light-weight. Connecting to a server only takes about 80 bytes. You stay connected the entire time, every data 'publication' (push data from device to server) and data 'subscription' (push data from server to device) is about 20 bytes. Both occur near instantaneously.

|
MQTT Control
|
Raspberry Pi as an MQTT Broker:
The IOT device must have access to a known "HUB" at a known IP address to set up the connection.
Some websites such as AdaFruit, Sparkfun and others offer MQTT Broker sites that accept public messages.
I prefer to have a local server/broker and have chosen to use a Raspberry Pi which will be permanently 'switched on'.
Accessing the Raspberry Pi from the PC:
The following steps explain how I set up the Raspberry Pi to Run an MQTT Broker service called 'Mosquitto'.
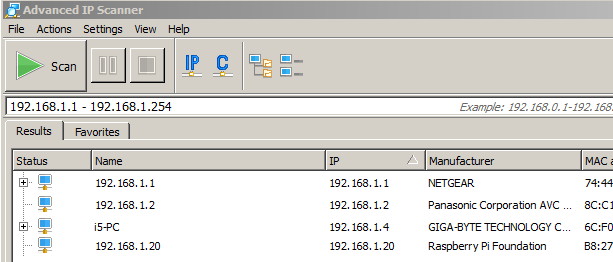
Start Raspberry Pi and note down the IP address. If you do not know the address then Run Advanced IP Scanner to get the address.
Advanced IP Scanner
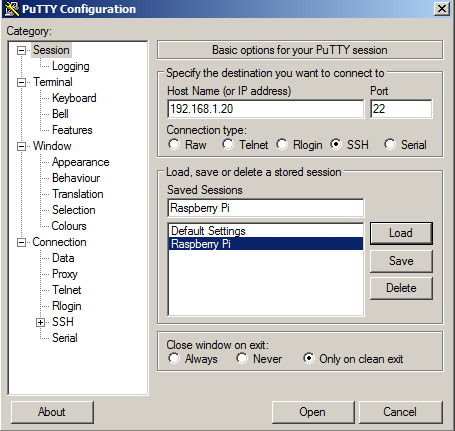
 Download the 'putty' application for windows: 'putty SSL terminal program'.
Click on the "For Windows on Intel x86 PuTTY: putty.exe" and "SAVE FILE". Then drag the "putty.exe" file to the desktop.
Run 'putty' and set the IP address, save as "Raspberry Pi" and 'OPEN'..
Download the 'putty' application for windows: 'putty SSL terminal program'.
Click on the "For Windows on Intel x86 PuTTY: putty.exe" and "SAVE FILE". Then drag the "putty.exe" file to the desktop.
Run 'putty' and set the IP address, save as "Raspberry Pi" and 'OPEN'..
 In 'putty', when you first open the connection you will get a warning message
about using a fingerprint key. Since it is just a local connection click 'YES'.
In 'putty', when you first open the connection you will get a warning message
about using a fingerprint key. Since it is just a local connection click 'YES'.
 As soon as the 'putty' terminal opens you then have to login to the Raspberry Pi. The default user is 'pi' and default password is 'raspberry'.
When in 'putty' the right mouse button 'pastes' the text from the clipboard into the command line.
This means you can copy commands from the examples below and run them directly on the Rasberry Pi.
As soon as the 'putty' terminal opens you then have to login to the Raspberry Pi. The default user is 'pi' and default password is 'raspberry'.
When in 'putty' the right mouse button 'pastes' the text from the clipboard into the command line.
This means you can copy commands from the examples below and run them directly on the Rasberry Pi.
Installing Mosquitto on the the Raspberry Pi:
First you should update your distribution:
Install pre-requisite software (THESE STEPS ARE PROBABLY NOT REQUIRED):
- sudo apt-get install libssl-dev
- sudo apt-get install cmake
- sudo apt-get install libc-ares-dev
- sudo apt-get install uuid-dev
- sudo apt-get install daemon
These commands from:
http://www.switchdoc.com/2016/02/tutorial-installing-and-testing-mosquitto-mqtt-on-raspberry-pi/
In 'putty' enter the following commands to install mosquito:
- sudo wget http://repo.mosquitto.org/debian/mosquitto-repo.gpg.key
- sudo apt-key add mosquitto-repo.gpg.key
- rm mosquitto-repo.gpg.key
- cd /etc/apt/sources.list.d/
- sudo wget http://repo.mosquitto.org/debian/mosquitto-wheezy.list
- sudo apt-get update
- sudo apt-get install mosquitto
In 'putty' run the following commands to ensure that 'Mosquitto' is running and listening on Port 1883,
- service mosquitto status
- netstat -tln
I have tried to create a "websocket listener" under Mosquitto,
but it appears that it is not supported in the current version of Mosquitto, and would require major work to upgrade to use this option.
MQTT USEFUL LINKS...
Testing Mosquitto from your Desktop Computer:
To test mosquitto you need to be able to "Publish" messages and also to Subscribe (and view) the messages.
Google Chrome supports an Add-On that will show MQTT Messages. (This works well).
Setting the Connection Details in Chrome MQTT Lens for Raspberry Pi.

Once connected you should Subscribe to "#" (means all messages) and you will
see any messages appear in the lower box. You can confirm it by typing anything into the Publish "Topic" and "Message" box and press "Publish".
Another useful tool for this is MQTT SPY which can be installed on a Windows Desktop Computer.
It is quite powerful but requires that a recent version of Java be installed and active.
There are also some Android Applications that can Subscribe, view and display MQTT messages from the MQTT server.
Creating an ESP8266 MQTT Sender:
This page which is being written will explain the setup of the ESP8266 with a DHT11 (Temperature and Humidity Sensor Module),
together with the software 'Arduino Sketch'. ESP8266 Mqtt Sender
..
Creating an Arduino Ethernet MQTT Client:
This page explains the setup of the 'Arduino Nano' and 'ENJ28J60 Ethernet' hardware.
This setup uses most of the available Memory in the 'Nano', and has been replaced with an
Arduino Mega and Ethernet Shield. This page will be updated soon, and software
'Arduino Sketch' added. Arduino Mqtt Client
.
To be able to make effective use of the data being returned from "Internet Things" some form of configurable Web based application is required.
There are a number of applications but 'OpenHAB' seems to fulfill most of the requirements, and is available for Raspberry Pi.
.
Installing OpenHAB on the the Raspberry Pi:
The following commands copied from 'MCU' Website:
.... https://mcuoneclipse.com/2015/12/23/installing-openhab-home-automation-on-raspberry-pi/
(Actual Download paths have been added to the original description)
In 'putty' enter the following commands to install OpenHAB:
.
First you should update your Distribution, and the Firmware (Reboot if Requested):
- sudo apt-get update
- sudo rpi-update
- sudo reboot
If Reboot is done then you will then need to restart 'Putty'
Create directory for the software, and download the files to that location:
- sudo mkdir /opt/openhab
- cd /opt/openhab
- sudo wget https://bintray.com/artifact/download/openhab/bin/distribution-1.8.3-runtime.zip
Now actually install the software...:
- cd /opt/openhab sudo
- sudo unzip distribution*.zip
- sudo rm distribution*.zip
Now we need to install the 'addons'...:
- cd addons/
- sudo wget https://bintray.com/artifact/download/openhab/bin/distribution-1.8.3-addons.zip
- sudo unzip distribution-1.8.3-addons.zip
- sudo rm distribution-1.8.3-addons.zip
Now set up some configurations...:
- cd ..
- sudo cp configurations/openhab_default.cfg configurations/openhab.cfg
- cd /opt/openhab
- sudo wget https://bintray.com/artifact/download/openhab/bin/distribution-1.8.3-demo.zip
- cd /opt/openhab
The next line moves all the 'addons' to a save directory ('addons.org').
- sudo mv addons addons.org
- sudo unzip distribution-1.8.3-demo.zip
- sudo rm distribution-1.8.3-demo.zip
- sudo chmod +x start.sh
- sudo ./start.sh
To restart the Demo after each new login (restart of Putty) ...:
- cd /opt/openhab
- sudo ./start.sh
View the Demo from a browser at 'http://192.168.1.20:8080/openhab.app?sitemap=demo'
Substitute your Raspberry Pi IP address if not '192.168.1.20'.
(Works best on Mozilla Firefox - tends to freeze on MS Internet Explorer)
Now we need to add the Bindings for MQTT ...:
- cd /opt/openhab
- cd addons/
The next line copies the MQTT bindings from the saved 'addons.org' directory
- sudo cp ../addons.org/org.openhab.binding.mqtt-1.8.3.jar org.openhab.binding.mqtt-1.8.3.jar
- cd /opt/openhab
- cd configurations
Make a copy of the configuration file before we edit it.
- sudo cp openhab.cfg openhab-backup.cfg
- sudo nano openhab.cfg
After the following line #mqtt (a new line without the '#')
...# URL to the MQTT broker, e.g. tcp://localhost:1883 or ssl://localhost:8883
...#mqtt: 'broker' .url=tcp:// 'host' :1883
... ...
- mqtt:mymosquitto.url=tcp://localhost:1883
... ...
After the following lines #mqtt (a new line without the '#')
...# Optional. Client id (max 23 chars) to use when connecting to the broker.
... ...
- mqtt:mymosquitto.clientId=openhab
Then press Ctrl-x and answer 'y' to Save, then ENTER to use the same filename.
.

|
WebPage for 'myhome1' under OpenHAB
.
This is a first attempt of running 'OpenHAB' on the Raspberry Pi together with the 'Mosquitto Broker'.
.
It shows the results of three separate ESP8266 modules; with DHT11 (Temperature and Humidity) sensors.
.
The Sensors are in three different rooms: Lounge, Kitchen and Bathroom.
.
All the modules 'subscribe' MQTT messages to the 'Mosquitto Broker' under the
topics 'lounge/temperature', 'kitchen/temperature' and 'bathroom/temperature'.
.
It also subscribes topics 'lounge/humidity' etc for each location.
|
.
. Now we have to create the configuration files for 'myhome1' OpenHAB (sitemap and items).
.
|
|
.'sitemap' configuration for OpenHAB
- cd /opt/openhab
- cd configurations
- cd sitemaps
- sudo nano myhome1.sitemap
Select all the text in this area, and paste to the editor on Raspberry Pi.
.
Don't forget to save 'ctrl-x', 'y', Enter.
|
.
.'items' configuration for OpenHAB
- cd /opt/openhab
- cd configurations
- cd items
- sudo nano myhome1.items
Select all the text in the above area, and paste to the editor on Raspberry Pi.
Don't forget to save 'ctrl-x', 'y', Enter.
View the this new configuration from a browser at
- http://192.168.1.20:8080/openhab.app?sitemap=myhome1
- --- Substitute your Raspberry Pi IP address if not '192.168.1.20'
The OpenHAB myhome1 program can be tested by running 'MQTTlens' and entering the following text into 'Publish'
......Replace topic with...
- lounge/temperature
......Replace Message with...
- 37.0
......Then Publish...
- Click the Green PUBLISH box
.......If the all the settings are correct you should see the '37.0' as the Temperature.
Enhancing myhome1 OpenHAB Application:
This page shows how the original 'sitemap' and 'items' files can be enhanced; and includes several examples.
IOT Setup - OpenHAB Enhancements
..
Adding mySQL Server to Raspberry Pi:
In OpenHAB; to provide 'Persistence' (memory of past results) a database of some sort is required.
The widely used mySQL is a database that will meet our requirements, and is fully supported by OpenHAB.
..
Adding a USB Hard Disk Drive to Raspberry Pi.
Because mySQL creates considerable disk activity (that would 'wear out' the Flash Memory),
it is suggested that an external USB Hard Drive be added to the Raspberry Pi.
It is important that the USB Drive has a separate Power Supply; as the newer 2.5inch
drives take power directly from the USB port, and would cause problems with the Raspberry Pi.
I have chosen to reuse a 3.5inch 1TB Seagate Windows backup drive, that has had all files erased.
.
In reading up about external USB Drives I have found that a USB 'Hard Disk' is
preferred; but not absolutely essential.
The higher quality USB Memory Sticks do "Wear Sharing" which moves the written
blocks around the memory space. So if a USB Hard Disk is not available just use
the same following steps for a 'large', 'quality' USB Memory stick.
... Plug in the USB Hard Disk Drive into the USB Port, and interrogate the structure.
- sudo blkid
... if the result looks like this; then it is an Windows NTFS filesystem.
... /dev/sda1: LABEL="Expansion Drive" UUID="024CBA744CBA61D9" TYPE="ntfs"
... NTFS causes problems with mySQL so it should be converted to an EXT4 filesystem.
- sudo mkfs.ext4 /dev/sda1 -L usbpi2
... you will now have an EXT4 drive on sda1:
... /dev/sda1: LABEL="usbpi2" UUID="e605b493-50ca-4d80-aa6c-f630fcc276fa" TYPE="ext4"
- cd /
- cd mnt
- sudo mkdir /mnt/usbdrive
- sudo mount /dev/sda1 /mnt/usbdrive
- sudo mkdir /mnt/usbdrive
... To view files on the USB Drive:
- ls -l /mnt/usbdrive
... To 'unmount' the USB Drive if no longer needed:
- sudo umount /dev/sda1
.
Installing MySQL on Raspberry Pi.
Now we proceed with tha actual installation of MySQL..
- cd /
- ... To avoid 'file not found' errors you most do the update command first...
- sudo apt-get update
- sudo apt-get install mysql-server --fix-missing
- ... when prompted choose a Password - write it down and enter it (twice!)..
- ... Now see if the mysql service is running.....
- service --status-all
- sudo apt-get install mysql-client php5-mysql
- sudo service mysql stop
- sudo service mysql start
- sudo service mysql restart
... Type the following to access the command line version of 'mysql'...
... Then when prompted type in the Password you wrote down earlier....
... When finished enter 'quit', or if stuck press 'CTRL c' to abort...
- mysql -p -u root
... The current version appears to be "Server version: 5.5.50-0+deb7u2 (Debian)"...
- show databases;
-
-
.
Setting Up MySQL to Use the USB Hard Disk Drive.
Before we proceed we need to confirm that the drive is Mounted and accessible..
- cd /
- cd mnt/usbdrive
... You can then look for files on the disk...
- ls -l
... there you will see at least one directory and perhaps some files:
- drwx------ 2 root root 16384 Aug 16 15:20 lost+found
... now you must 'stop' mysql before you copy any files...
- sudo /etc/init.d/mysql stop
- ... First we must copy any exiting files to the new location...
- sudo cp -R -p /var/lib/mysql /mnt/usbdrive
... Now you will see at least two directories (and perhaps some files):
- drwx------ 2 root root 16384 Aug 16 15:20 lost+found
- drwx------ 4 root root 4096 Aug 20 21:52 mysql
... you can then see if the files have been copied (I had about 7 listed)...
- sudo ls -l mysql
- ... Now; we need to edit mysql's configuration file
|
|
.Editing 'Config Settings' for MySQL
- cd /
- cd etc/mysql
- sudo cp my.cnf my.origcnf
- sudo nano my.cnf
... locate "datadir = /var/lib/mysql"
.... put a '#' in front of that line and
.... add the following line:...
- datadir = /mnt/usbdrive/mysql
- Don't forget to save 'ctrl-x', 'y', Enter.
|
.
Now we must set the 'ownership' and restart the 'mysql' server ...
- sudo chown -R mysql:mysql /mnt/usbdrive/mysql
- sudo /etc/init.d/mysql restart
Testing MySQL with the USB Hard Disk:
The following procedure describes how to test MySQL is working and confirm
that it is creating Data Files on the USB Hard Disk; not on the EPROM card.
First open two 'putty' windows and log on as 'pi' (password 'raspberry'):
.
|
|
....MySQL session under 'putty'
.. Paste the following text to access the cmd line version of 'mysql'...
.. When prompted type in the Password you wrote down earlier...
.. When finished enter 'quit', or if stuck press 'CTRL c' to abort..
.. All MySQL commands should end with a semicolon (";") ..
- mysql -p -u root
- show databases;
... you should see something similar to the text display on the left.
|
...In the second 'putty' window go to the mounted USB hard disk directory..
- cd /mnt/usbdrive
... You can then look for files on the disk under the 'mysql' directory...
- sudo ls -l mysql
... there you will see a list of about seven Files and Directories:
|
.MySQL Database Creation commands under 'putty'
- create database test_database;
- show databases;
- ... you should see something similar to this text display.
... Now go to the other 'putty window and list files on the Hard Disk.
- sudo ls -l mysql
... You should now see an extra file on the Hard Disk.
- drop database test_database;
- show databases;
... Now go to the other 'putty window and list files on the Hard Disk.
- sudo ls -l mysql
... You should now see one less file on the Hard Disk.
|
|
Now - that completes the installation and Testing of MySQL with the USB Hard Disk.
Adding Persistence using MySQL OpenHAB
We will now proceed with setting up MySQL 'Persistence' in OpenHAB.
To do this we need to create the initial OpenHAB database tables,
then edit the OpenHAB config files to use MySQL and those database tables.
First Some Web sites with information....
... Run the command Line version of MySQL and enter the password...
- mysql -p -u root
... First we create the empty database for OpenHAB...
- show databases;
- create database openhab;
- show databases;
...Now we have to set up the User and Priileges for the MySQL database...
- CREATE USER 'openhab'@'localhost' IDENTIFIED BY 'openhab';
- GRANT ALL PRIVILEGES ON openhab.* TO 'openhab'@'localhost';
- use mysql;
... the \G at the end of the next command creates a vertical display...
- select * from db openhab \G;
- quit;
... you can now test the command line version with user='openhab' password='openhab'...
- mysql -p -u openhab
- show databases;
- quit;
.
...Now we have to let OpenHAB know about the new MySQL database...
... Enter the following command to check the 'openhab' database is on the USB Drive...
- sudo ls -l /mnt/usbdrive/mysql
... Copy the mysql 'addons' that we stored in the 'addons.org' directory back to 'addons'
- cd /opt/openhab
- sudo cp addons.org/org.openhab.persistence.mysql-* addons
|
|
...Creating the Persistence Configuration File
- cd configurations/persistence
- sudo nano mysql.persist
... Select the text in the window on the left...
... copy and paste within Nano...
... Don't forget to Save (Ctrl-x, 'y', Enter)
- sudo ls -l
|
... Updating the OpenHAB Configuration File ...
- cd /opt/openhab/configurations/persistence
- sudo nano mysql.persist
- cd /opt/openhab/configurations
- sudo nano openhab.cfg
...Find the corresponding lines in the config file (see above) and replace them with the lines below.
- mysql:url=jdbc:mysql://127.0.0.1:3306/openhab
- mysql:user=openhab
- mysql:password=openhab
- mysql:reconnectCnt=1
.. Don't forget to Save (Ctrl-x, 'y', Enter)
- sudo ls -l
.... And finally, restart OpenHAB:...
- cd /opt/openhab
- sudo ./start.sh
... browse this address to see if the data is being stored ...
- http://192.168.1.20:8080/chart?items=TestTemperature2&period=4h&service=mysql
Setting op OpenHAB to run continuously:
With Persisistent recording of readings it is important that OpenHAB should not
shut down as the user closes window, and should start automatically when Raspberry Pi Reboots.
Most of the following section is taken directly from this page:
Raspberry Pi - keeping OpenHAB active
.
Creating the OpenHAB Auto Start on Boot File
- cd /etc/init.d
- sudo nano openhab
... Select the text in the window below...
... copy and paste within Nano...
... Don't forget to Save (Ctrl-x, 'y', Enter)
... Then make the script executable...
- sudo chmod 777 /etc/init.d/openhab
For starting OpenHAB in the background, seeing the status, and stopping or restarting it:
- sudo /etc/init.d/openhab start
- /etc/init.d/openhab status
- sudo /etc/init.d/openhab stop
- sudo /etc/init.d/openhab restart
-
... To make this script start up by default on boot: ...
- sudo update-rc.d openhab defaults
.... If you ever want to undo this, run: ...
- sudo update-rc.d -f openhab remove
.
Other Upgrades to Raspberry Pi, Apache, PHP, PHPadmin etc,:
This page goes into further details for Raspberry Pi Enhancements.
Includes standard Linux commands etc that I often forget. Raspberry Pi Enhancements
.
Last updated: 22-AUG-2016 at 08:45 PM.
|
|

