This page logs my setup and ongoing experimentation for development of 'Internet of Things'.
The information is frequently 'borrowed' from other web sources (hopefully with
proper acknowledgement) and may change as my experience advances.
It does not claim to be up to my normal Professional Engineering standards,
but is just for experimentation in what is a 'very exciting field'.
Creating an ESP8266 MQTT SENDER:
This section will explain how to wire up and program an "ESP8266" module with an "DHT11 Sensor".
- Wire up the ESP8266 module with DHT11 Sensor as per the following drawing....
- Be very careful about the power supply to ensure the ESP-12 does not exceed 3.3Volt....
- But remember, if using a modular Power Supply module that these need 8-12 Volt input...

- Run the Arduino IDE and open a new 'Sketch' which contains some suggested code.
- Select and Copy the all text from the following window.
- Paste all the text (overwriting the new 'Sketch' suggestions).
- Update the 'WIFINAME', 'PASSWORD' and 'mqtt_server' with your values.
- If you Network uses an Address other the 192.168.1.xxx enter IPADDRESS and ROUTER_ADDRESS.
- 'File => Save As' the Sketch 'ESP8266_DHT_lounge_192' .
- (The naming convention includes the location 'lounge' and the IP address '192'.)
- Ensure that the Tools => Board: is set to 'Generic ESP8266 Module'
- 'Verify / Compile' the Sketch.
- Place a jumper between GPIO0 and GROUND.
- Press the Reset button and 'Upload' the Sketch.
- Remove the programming jumper and press the Reset button again.
- Create the other ESP8266 boards and load 'ESP8266_DHT_kitchen_193' etc.
- This is the Scematic for the above ESP8266 wiring...

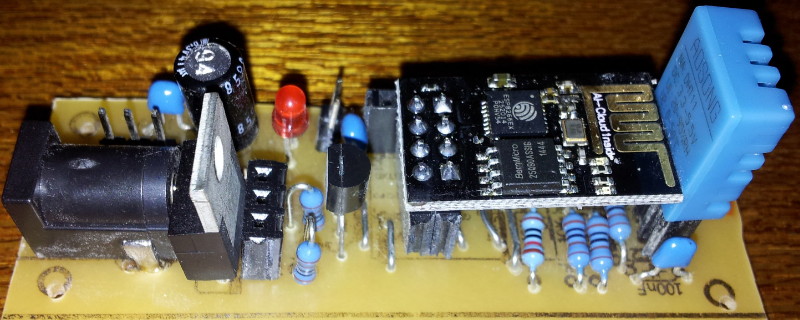
Creating an ESP01 PCB Version of the MQTT SENDER:
This section will explain how to create and program an "ESP01" module with a
"DHT11 Sensor", and an external sensor input - that can be connected to a PIR Motion Detector.
.
.
- Note - This module is designed run from a 5volt plugpack....
- It can also be powered from batteries (4 x AA cells) using a three pin connector....
- The three pin connector is wired with +6v on the Middle pin and GROUND on both outside pins...
- This ensures that it cannot be plugged in the wrong way.
|
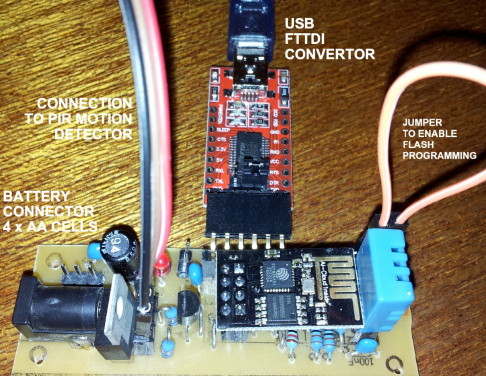
Connections for new ESP01 PCB
.
To program the PCB; a jumper must be placed across the 'Flash' connector and the RESET button (just beside the jumper) must be pressed.
.
The USB FTTDI Adapter provides the connection to the programming computer.
.
The three wires plugged into the board (just behind the Regulator IC), are for the connection to the HC-SR501 PIR detector.
They are:
- RED (Plus 5volt)
- BROWN (PIR output)
- BLACK (Ground)
.
|

.
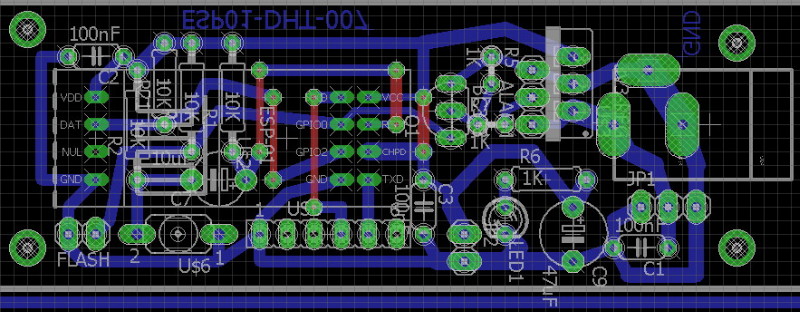
This is the new PCB for the above ESP01 wiring...
.
- The 'Sketch' software for this module has several features to support the HC-SR501 sensor....
- The ESP01 Arduino IDE 'Sketch' software for this module has been named "ESP01_DHT_Outdoor_PIR_195" ..
- All messages are returned under the 'outdoor/pir' topic as a decimal number eg: '50.1', '00.9', or '99.9'....
- Initialization can take up to 60 seconds, before readings can be trusted...
- ...During this time it will send '50.1', '50.2' etc and will ignore any status until after '50.6'....
- A High state will be returned as numbers starting with '99.1', '99.2'... increasing every 10 seconds up to '99.9' ...
- A Low state will be returned as numbers starting with '00.1', '00.2'... increasing every 10 seconds up to '00.9' ...
- This allows the OpenHAB application to work out how long it should wait for each transition ...
Software for "ESP01_DHT_outdoor_PIR_195"
Follow the instructions earlier on this page to load this Arduino 'Sketch'.
Last updated: 20-AUG-2016 at 03:05PM.
|
|

