THIS PAGE UNDER DEVELOPMENT 21-MAY-2018 8:39PM - COME BACK LATER FOR MORE INFO.
This page logs my setup and ongoing experimentation for development
of 'Internet of Things', specifically using the Raspberry Pi Zero W.
.
The new Raspberry Pi Zero W (Wireless):

|
The new Raspberry Pi Zero is smaller in every way.
.
CAUTION: The Raspberry Pi Zero only has 'Micro USB' and 'Mini HDMI' ports.
You will need to purchase adaptors to support these smaller connectors - or buy one of the Pi Zero 'Essentials kits'.
|

|
|
'RASPBERRY PI ZERO W' SUPPLIERS.
The Raspberry Pi Zero is not available from all 'Raspberry Pi' dealers.
The following 'suppliers' appear to have available stocks.
- Core Electronics (Good range of Microprocessor and Robotics Components)
- PiAustralia (Raspberry Pi Australia - run by Little Bird Electronics)
Currently Core Electronics sell the 'Raspberry Pi Zero W (Wireless)' for $14.96 inc GST,
and the basic 'Raspberry Pi Zero' for $7.48 inc GST.
For both they say "Limit of one per customer (as requested by the Raspberry Pi Foundation)".
The primary advantage of the 'Raspberry Pi Zero W (Wireless)' version is that it can be run
'headless'. (ie. No need for a screen or keyboard)
Setting up a new 'Raspberry Pi Zero W':
This section describes the steps in setting up a new Raspberry PI Zero.
- ... For the Pi Zero it is recommended to use 'Raspbian Stretch'
- Download the latest Raspian from RASPIAN (currently 'Stretch' Ver 4.14)
- .... Note where the File ( eg: 2018-04-18-raspbian-stretch.zip) is downloaded to
- .... - usually the 'Downloads' directory - leave it 'zipped'.
- Format your microSD card to FAT32
- Download the image writer program 'Etcher' from Etcher
- .... - (Ensure it is correct Version for your 'Operating System' )
- Choose 'Save File'.
- .... Locate where this File is downloaded to (usually 'Downloads' directory)
- Create a working directory (eg. "G:\Raspberry-Pi-Zero") and drag both files there.
- Double click the 'Etcher-Setup-xxx' application - it will install and run immediately.
- In the 'Etcher' box click 'Select image' - choose eg. "2018-04-18-raspbian-stretch.zip"
- In the 'Etcher' box (check SD drive info) and click 'Flash'.
- ... wait for it to complete, and verify.
- ... you now have a new disk eg. "boot(i:)".
- ... To see the 'SD-drive' you may have to remove and replace the USB connector.
Activating 'Wireless' on your 'Raspberry Pi Zero W':
This section describes the steps in setup the Wireless function on your new Raspberry PI Zero.
|
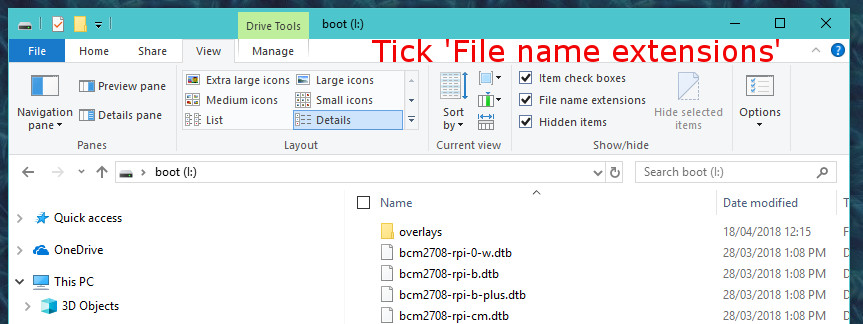
Change File Explorer to see 'File name extensions'.
.
Use File Explorer to view the SD-card 'drive' eg. "boot(i:)".
On the top of the window 'Click' the "View" tab, and Tick 'File name extensions' box.
|
|
|
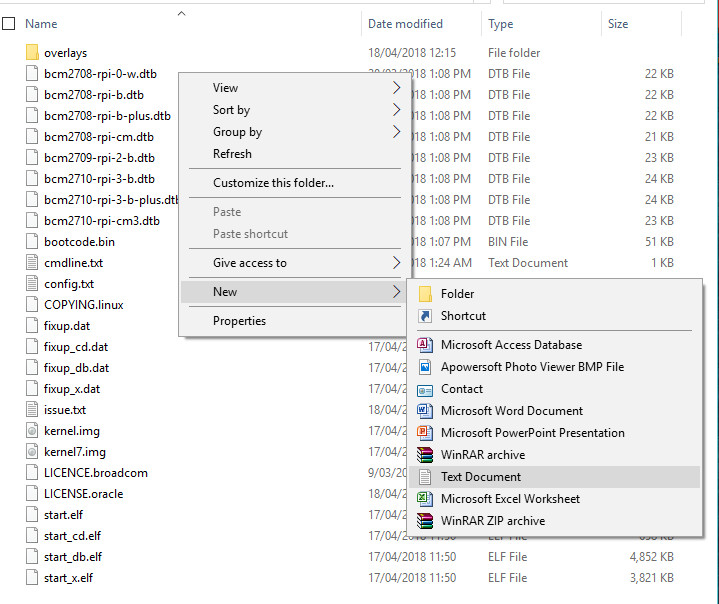
Create the Wireless activation Files.
|
Create a 'New' 'Text File' in the "boot(i:)" top directory..
.
Rename the file named 'wpa_supplicant.txt' so that it can be edited.
'Double click' the file and it will open in 'Notepad' editor.
|
... Copy the following lines into the new file...
... REMEMBER: Change the SSID_NAME to your wifi 'network name', and password to your own....
... Now Save, then Close Notepad...
... Now 'Right Click' on 'wpa_supplicant.txt' and select 'Rename'.
Change the name to 'wpa_supplicant.conf' and then click 'Yes' when asked 'Are you sure you want to change it?'.
Now repeating the above process 'Create' a new empty file.
Change the name to 'ssh' - with no 'File Name Extension', and click 'Yes' when asked 'Are you sure you want to change it?'.
The new Files added to the SD-Card:

We now need to take the SD-CARD out of the USB adapter.
---- DONT FORGET TO 'Eject USB Storage' AND WAIT FOR THE 'OK' MESSAGE.
Place the New SD Card into the Raspberry Pi Zero and apply power.
Wait until the the 'Green' Led on the Rapberry Pi Zero stops flashing.
Then on your Desktop Computer start 'PuTTY' and connect to "raspberrypi".
Answer 'Yes' to the 'PuTTY Security Alert' Message (a once only message!).
Login to the PuTTY session with the default Username='pi' and Password='raspberry'
It is preferred that the 'Hostname' be changed - so that you can use multiple RaspberryPi Zeros.
Run "sudo raspi-config" and Select "2 Network Options" then "1 Hostname"
Change the Hostname to "PiZero-1" and 'tab' to '' and Enter.
When asked if Ok to Reboot say 'OK'.
Now on your Desktop Computer start 'PuTTY' and connect to "PiZero-1".
Setting A Fixed IP Address...
In the PuTTY command window get the current configuration
sudo ifconfig
Note "wlan0" specifically
Must set up interface wlan0: in config file.
inet addr:192.168.1.61 Bcast:192.168.1.255 Mask:255.255.255.0
... see this article for Jessie...
Refer to Setting Static IP
sudo nano /etc/dhcpcd.conf
... Go to the end of the file and add these lines...
... This presumes and Address of 192.168.1.20 (change to preferred values)...
To exit the editor, press ctrl+x
To save your changes press the letter “Y” then hit enter
Shut down Raspberry Pi and Restart
Don't forget you need to change your PuTTY address to new IP address.
.
Setting up MQQT on 'Raspberry Pi Zero W':
This section describes the steps in setting 'Paho' MQTT a new Raspberry PI Zero.
- ... Before you start - you should ensure that the system is up to date.
- cd /
- sudo apt-get update
- .... Now we add the Paho MQTT client
- sudo pip install paho-mqtt
- .... Return to the user's 'Home' directory
- cd $home
- cd Documents
- .... Now create a blank file
- nano
-
- ... Select all the text from the window below and paste into it...
- .. then 'Ctrl-X' to exit and answer 'Yes' to save
- ... and save as 'mqtt_client_demo.py'
- .
- .
- .... Now create a blank file
- nano
- ... Select all the text from the window below and paste into it...
- .. then 'Ctrl-X' to exit and answer 'Yes' to save
- ... and save as 'mqtt_publish_demo.py'
- .
-
- ... Run "mqtt-spy" on your PC
- ... Open a connection to 192.168.1.20
- ... Subscribe to "#"
-
- ... Log onto a new PuTTY session.
- cd Documents
- ... Now we run the 'mqtt_publish_demo' program.
- python mqtt_publish_demo.py
- ... You should see two messages appear in Mqtt-spy window.
-
- ... Log onto a new PuTTY session.
- cd Documents
- ... Now we run the 'mqtt_client_demo' program.
- python mqtt_client_demo.py
- ... Then run the Publish program again in the first PuTTYT window
- ... You should now see two messages appear in PuTTY window.
- ... You can now use the same "publish.single" command in your python scripts.
- A new project (coming soon) will show how to use a Raspberry Pi Zero Wireless
- for an IOT device- complete with an added A2D conversion.
.
USING RASPBERRY PI ZERO W' WITH SCREEN AND KEYBOARD.
- Download the latest Raspian from RASPIAN (currently 'Stretch' Ver 4.4)
- .... Note where the File ( eg: 2018-04-18-raspbian-stretch.zip) is downloaded to
- .... - usually the 'Downloads' directory - leave it 'zipped'.
- Format your microSD card to FAT32
- Download the image writer program 'Etcher' from Etcher
- .... - (Ensure it is correct Version for your 'Operating System' )
- Choose 'Save File'.
- .... Locate where this File is downloaded to (usually 'Downloads' directory)
- Create a working directory (eg. "G:\Raspberry-Pi-Zero") and drag both files there.
- Double click the 'Etcher-Setup-xxx' application - it will install and run immediately.
- In the 'Etcher' box click 'Select image' - choose eg. "2018-04-18-raspbian-stretch.zip"
- In the 'Etcher' box (check SD drive info) and click 'Flash'.
- ... wait for it to complete, and verify.
- ... you now have a new disk eg. "boot(i:)".
- ... To see the 'SD-drive' you may have to remove and replace the USB connector.
-
Connect a Screen, Keyboard and Mouse and 'Insert' new microSD card...
- Power up, and wait for completion...
... When the Raspberry Pi Graphical Screen is displayed ...
- Click the mouse on the "Command Box" on the top bar..
... then update your distribution ...
-
- Refer to Raspberry Pi Update Learning Resources
-
- sudo apt-get update
- ---
.. Remote Putty does not work ..Raspberry changed something since November 2016..
.. here is the 'noob' instruction to get this problem fixed..
- sudo su
- raspi-config
- 1) Choose first 'update'
- 2) In Advanced Options -> expand_root file system
- 3) Interfacing Options -> ssh [enable]
- 4) change Location->Locale [your country-UTF8]
- 5) and while you still here, it's good to change the timezone as well
- ---
- Lookup the IP Address so you can use a PuTTY window.
- sudo ifconfig
- Note "eth0" specifically to get the IP Address.
- Open a PuTTY window for that IP address
Setting A Fixed IP Address...
- In the PuTTY command window get the current configuration
- sudo ifconfig
- Note "eth0" specifically
- Must set up interface eth0: in config file.
- inet addr:192.168.1.20 Bcast:192.168.1.255 Mask:255.255.255.0
... see this article for Jessie...
Refer to Setting Static IP
-
- sudo nano /etc/dhcpcd.conf
... Go to the end of the file and add these lines...
... This presumes and Address of 192.168.1.20 (change to preferred values)...
-
-
To exit the editor, press ctrl+x
To save your changes press the letter “Y” then hit enter
- Shut down Raspberry Pi and Restart
- Don't forget you need to change your PuTTY address to new IP address.
Last updated: 16-JUN-2018 at 12:06 pm.

