This page logs my setup and ongoing experimentation for development
of 'Internet of Things'
(ESP8266 sensors), using the Raspberry Pi, running the latest version of 'Raspian'
(Buster),
and the latest version of openHAB 2, with a separate Mosquitto Broker.
It presumes that you already have one or more ESP8266, or similar, IOT modules
running, and currently generating MQTT messages.
I also recently tried several times to load an "openHabian" release - but each time it failed totally.
The following instructions load each element separately - so I can monitor the progress, and make corrections.
Setting up a new Raspberry Pi:
This section describes the steps in setting up a new Raspberry PI.
Installing Mosquitto on the the Raspberry Pi:
First you should update your distribution:
Install pre-requisite software (THESE STEPS ARE PROBABLY NOT REQUIRED):
Where prompted about memory usage answer 'Y' 'Enter'.
- sudo apt-get install libssl-dev
- sudo apt-get install cmake
- sudo apt-get install libc-ares-dev
- sudo apt-get install uuid-dev
- sudo apt-get install daemon
- sudo apt-get update
- sudo apt-get install mosquitto
In 'putty' run the following commands to ensure that 'Mosquitto' is running and listening on Port 1883,
- service mosquitto status
- netstat -tln
A important tool for testing Mosquitto and MQTT is MQTT SPY which can be installed on a Windows Desktop Computer.
It is quite powerful but requires that a recent version of Java be installed and active.
.
Setting the Connection Details in "mqqt-spy" for Raspberry Pi:
...

|
Subscribing to MQTT messages
.
Once connected you should Subscribe to "#" (means 'all' messages).
.
You will then see any 'Subscribed Messages' appear in the lower box.
.
You can confirm it by typing anything into the "Publish Message" "Topic"
and "Data" box and press "Publish".
If 'Mosquitto' is working on the Raspberry Pi the text should
appear in the "Messages" window.
|

|
|
- If you have not made any IOT sensors yet, then this is the exact point where you should make an ESP8266 sensor.
- I would recommend not trying to setup openHAB 2, until you are able to see MQTT messages appearing in this window.
- MQTT-Sender Making an ESP8266 MQTT Sender
To be able to make effective use of the data being returned from "Internet Things" some form of configurable Web based application is required.
There are a number of applications but 'OpenHAB' (now version 2) seems to fulfill most of the requirements, and is available for Raspberry Pi.
.
Installing OpenHAB 2 on the the Raspberry Pi:
Installing OpenHAB 2 in the Raspberry Pi.
The following instructions quoted directly (with extra comments and steps added) from...
Verify Java Version
openHAB makes extensive use of Java and version 1.6 or higher is required. The first step is to ensure our Raspberry Pi includes a recent version of Java.
The Raspberry Pi will present the version of Java installed as shown below.
    openjdk version "11.0.6" 2020-01-14
    OpenJDK Runtime Environment (build 11.0.6+10-post-Raspbian-1deb10u1)
    OpenJDK Server VM (build 11.0.6+10-post-Raspbian-1deb10u1, mixed mode)
Documentation for openHAB says "For best compatibility, namely with the
openHAB Cloud service myopenhab.org and the Eclipse IoT Marketplace, the minimum
recommended Java 8 revision is "161".
In my case, I have an install version of openjdk version 11.0.6
The is the the OpenJDK version and "OpenJDK may also be used, but it
has some known limitations with openHAB and is not recommended." - so keep an
eye open for problems..
Apt Based Systems
First, add the openHAB 2 Bintray repository key to your package manager and allow Apt to use the HTTPS Protocol:
wget -qO - 'https://bintray.com/user/downloadSubjectPublicKey?username=openhab' | sudo apt-key add -
sudo apt-get install apt-transport-https
echo 'deb https://dl.bintray.com/openhab/apt-repo2 stable main' | sudo tee /etc/apt/sources.list.d/openhab2.list
sudo apt-get install openhab2
sudo apt-get install openhab2-addons
# Systems based on systemd (e.g. Debian 8, Ubuntu 15.x, Raspbian Jessie and newer):
    sudo systemctl start openhab2.service
    sudo systemctl stop openhab2.service
    sudo systemctl status openhab2.service
    sudo systemctl daemon-reload
    sudo systemctl enable openhab2.service
[openHAB] Please use the following commands to launch openHAB on a system restart.
            sudo /bin/systemctl daemon-reload
            sudo /bin/systemctl enable openhab2.service

[openHAB] You can start openhab2 manually by executing the command:
            sudo /bin/systemctl start openhab2.service
Initial Setup of openHAB2:
.
...
|
.
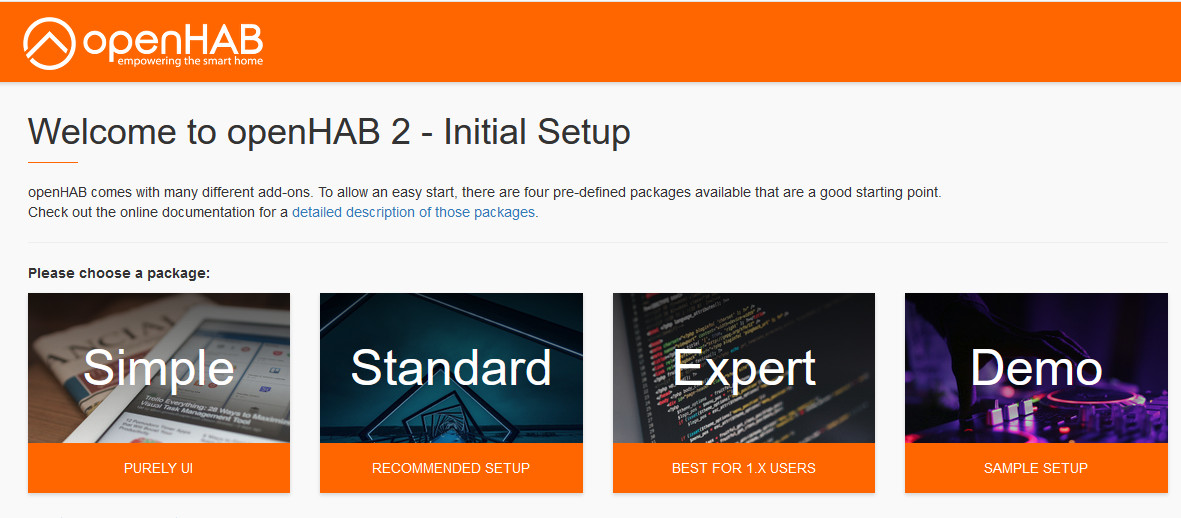
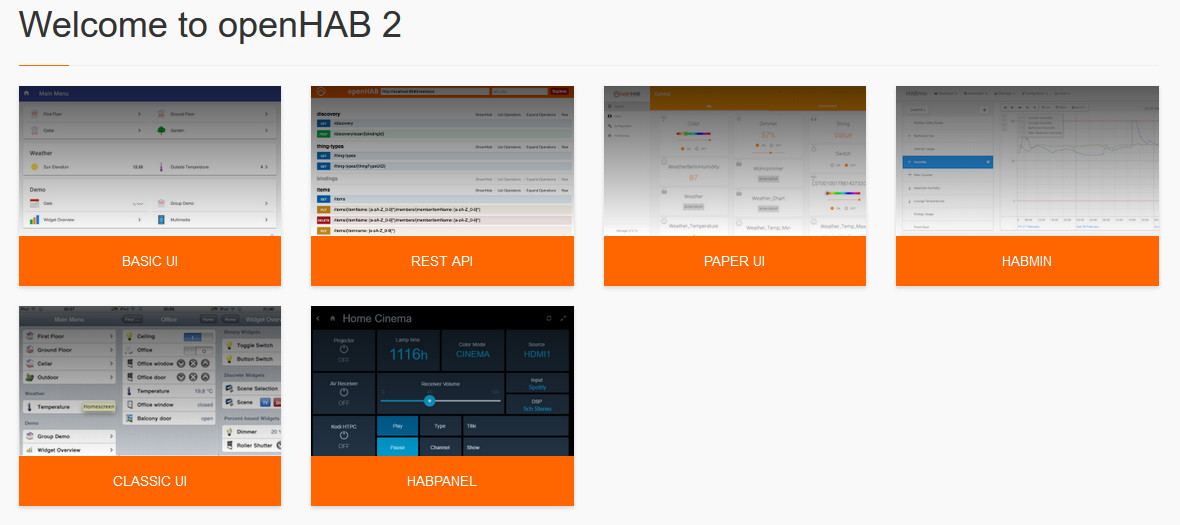
Chosing the openHAB 2 package
.
Of the four standard packages, the preferred one is the "Expert Package",
because it is most suitable for experienced Users.
.
However, I prefer to add the 'Demo' Package first as it sets up the various
Icons, and example Items files needed.
I expect this will be best used for setting up existing 'Items' and "Sitemaps".
Select it now and and wait for its' Intallation. You will be able to use the PaperUI later anyhow.
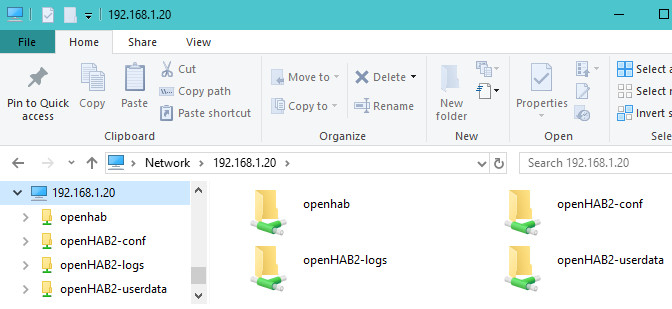
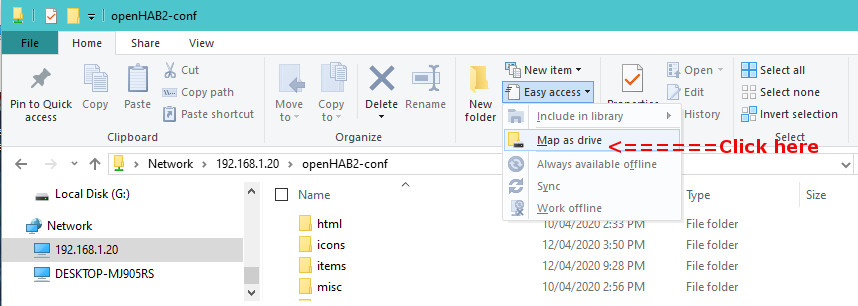
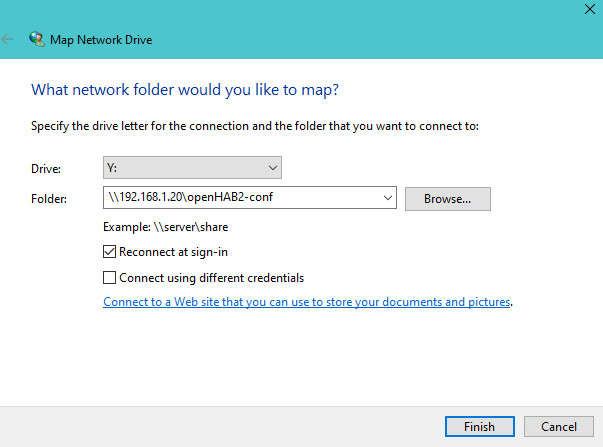
When it is completed we need to set up the 'Samba' shares so that we can
edit the configuration files directly from the Desktop PC.
|
|
|
.
Installing Samba on the Raspberry Pi
Samba is a file sharing application that allows you to share files
directly between your desktop PC and the Raspberry Pi.
The following Video (from BK Hobby) shows how to set up Visual Studio editing of files on the Raspberry Pi.
The following Video (from BK Hobby) shows "openHAB 2 Basics - Items & Links | Creation and Configuration".
|
.
SETTING UP OPENHAB2...
-
openHAB 1 migration to openHAB2 step by step instructions
. Choose the UI in openHAB2 from the following options:
To quote from the above article: "Navigate your browser to ....
Select "Expert" from the list of default packages.
Now select "PaperUI" and navigate
to Configuration -> System on the left hand side.
Enable "Include Legacy 1.x Bindings" and "Access Remote Repositories".
This will allow you to install your current bindings even if there is an openHAB 2 version available. Press "Save".
...
 . .
. .
File Locations
Repository Installation
- openHAB application.... /usr/share/openhab2
- Additional add-on files.... /usr/share/openhab2/addons
- Site configuration....... /etc/openhab2
- Log files................ /var/log/openhab2
- Userdata like rrd4j databases../var/lib/openhab2
- Backups folder..../var/lib/openhab2/backups
- Service configuration.... /etc/default/openhab2
- Detailed Config files..... /etc/openhab2/services
INITIAL OPENHAB2 CONFIGURATION USING THE PAPERUI
. .
First we have to install the 'MQTT Broker' Add-on supporting the Mosquitto Broker.
|
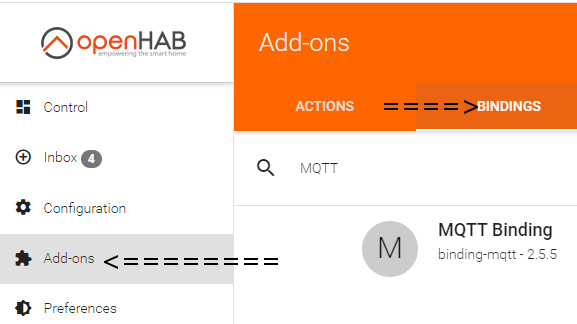
Installing the MQTT Binding
.
Start the PaperUI
.
Then you must select the "Add-ons" option.
.
Click on the "BINDINGS" tab at the top of the page
.
Type "MQTT" into the search bar and look for 'MQTT Binding'
.
On the far right of the screen click on the "INSTALL"
and wait for it to complete.
.
The following configuration files will set up everything.
|
|
|
. .
-
agrinode: OpenHab2 - MQTT binding demo
- The above 'blog' shows how to add the MQTT binding by edit to mqtt.config file, and provided the basis for the following files.
- Using Visual Studio, in a SAMBA share, go the "things" directory.
- Right Click on "things" to create a 'New File' which is named to "mqtt.things"
- then copy the following text and paste to that file.
- "Save All"
- ....
- Right Click on "items" to create a 'New File' which is named to "mqtt.items"
- ..Then enter this text into that new file. ...
- Right Click on "items" to create a 'New File' which is now named to "myhome1.items"
- ..You will also need at least these same lines in that file ...
- ..The reason for having the items in both files is not completely clear - but is absolutely needed to work,...
- ... and could be related to the 'Channel' needing a 'item' definition at both ends!
- ....
- ....
- Right Click on "sitemaps" to create a 'New File' which is named to "myhome1.sitemap"
- ..Then copy and paste this text into that new file. ...
- ....
- Save All files
- In a browser window type http://192.168.1.20:8080/basicui/app?sitemap=myhome1
to view the myhome1 site.
..
- if the sitemap does not appear as shown here then stop and restart openhab2 ...
- Stop openhab2 service..
sudo systemctl stop openhab2.service
- Wait about two minutes
- Start openhab2 service..
sudo systemctl start openhab2.service
- Wait about five minutes
- If this does not work then refresh the main pages in PaperUI - 'Add ons' and 'Control' pages.
- The same numbers and titles should appear in the PaperUI 'Control' page.
|

|
|
|
The further setup of persistence and graphical displays will be handled in a separate page - to be added soon..
-
Raspberry Pi Setup [latest 'Raspian OS', 'openHAB2', and 'Mosquitto Broker'] PART2
General Raspberry Pi Linux Commands and Hints:
This section Lists the useful Linux Commands that I often forget.
... Report on Free Space on the SD Card ...
- df -Bm
... Clear the Putty screen ...
- clear
... update your distribution ...
- sudo apt-get update
... To totally shutdown Raspberry Pi...
- sudo shutdown -h now
... check up on Mosquitto (MQTT Broker) ...
- service mosquitto status
- netstat -tln
To stop and restart the OpenHAB2 as required.
- sudo systemctl start openhab2.service
- sudo systemctl stop openhab2.service
- sudo systemctl status openhab2.service
- sudo systemctl daemon-reload
- sudo systemctl enable openhab2.service
To modify an OpenHAB2 config Files (use sudo nano (filename) ...:
- openHAB application.... /usr/share/openhab2
- Additional add-on files.... /usr/share/openhab2/addons
- Site configuration....... /etc/openhab2
- Log files................ /var/log/openhab2
- Userdata like rrd4j databases../var/lib/openhab2
- Backups folder..../var/lib/openhab2/backups
- Service configuration.... /etc/default/openhab2
- Detailed Config files..... /etc/openhab2/services
To List the Files in the MySQL directory on the Hard Disk ...:
- sudo ls -l /mnt/usbdrive/mysql
To test the command line mysql with user='openhab' password='openhab'...
- mysql -p -u openhab
- show databases;
- use openhab;
- SHOW COLUMNS FROM Item1;
- show tables in openhab;
- SHOW TABLE STATUS FROM db_name;
- quit;
Last updated: 05-AUG-2023 at 9:40 AM.
|
|
|