This page logs my setup and ongoing experimentation for development
of 'Internet of Things'
(ESP8266 sensors), using the Raspberry Pi 4, running the dedicated version of 'Hass OS'
,
running the new home automation system "Home Assistant".
It presumes that you already have one or more ESP8266, or similar, IOT modules
running, and currently generating MQTT messages.
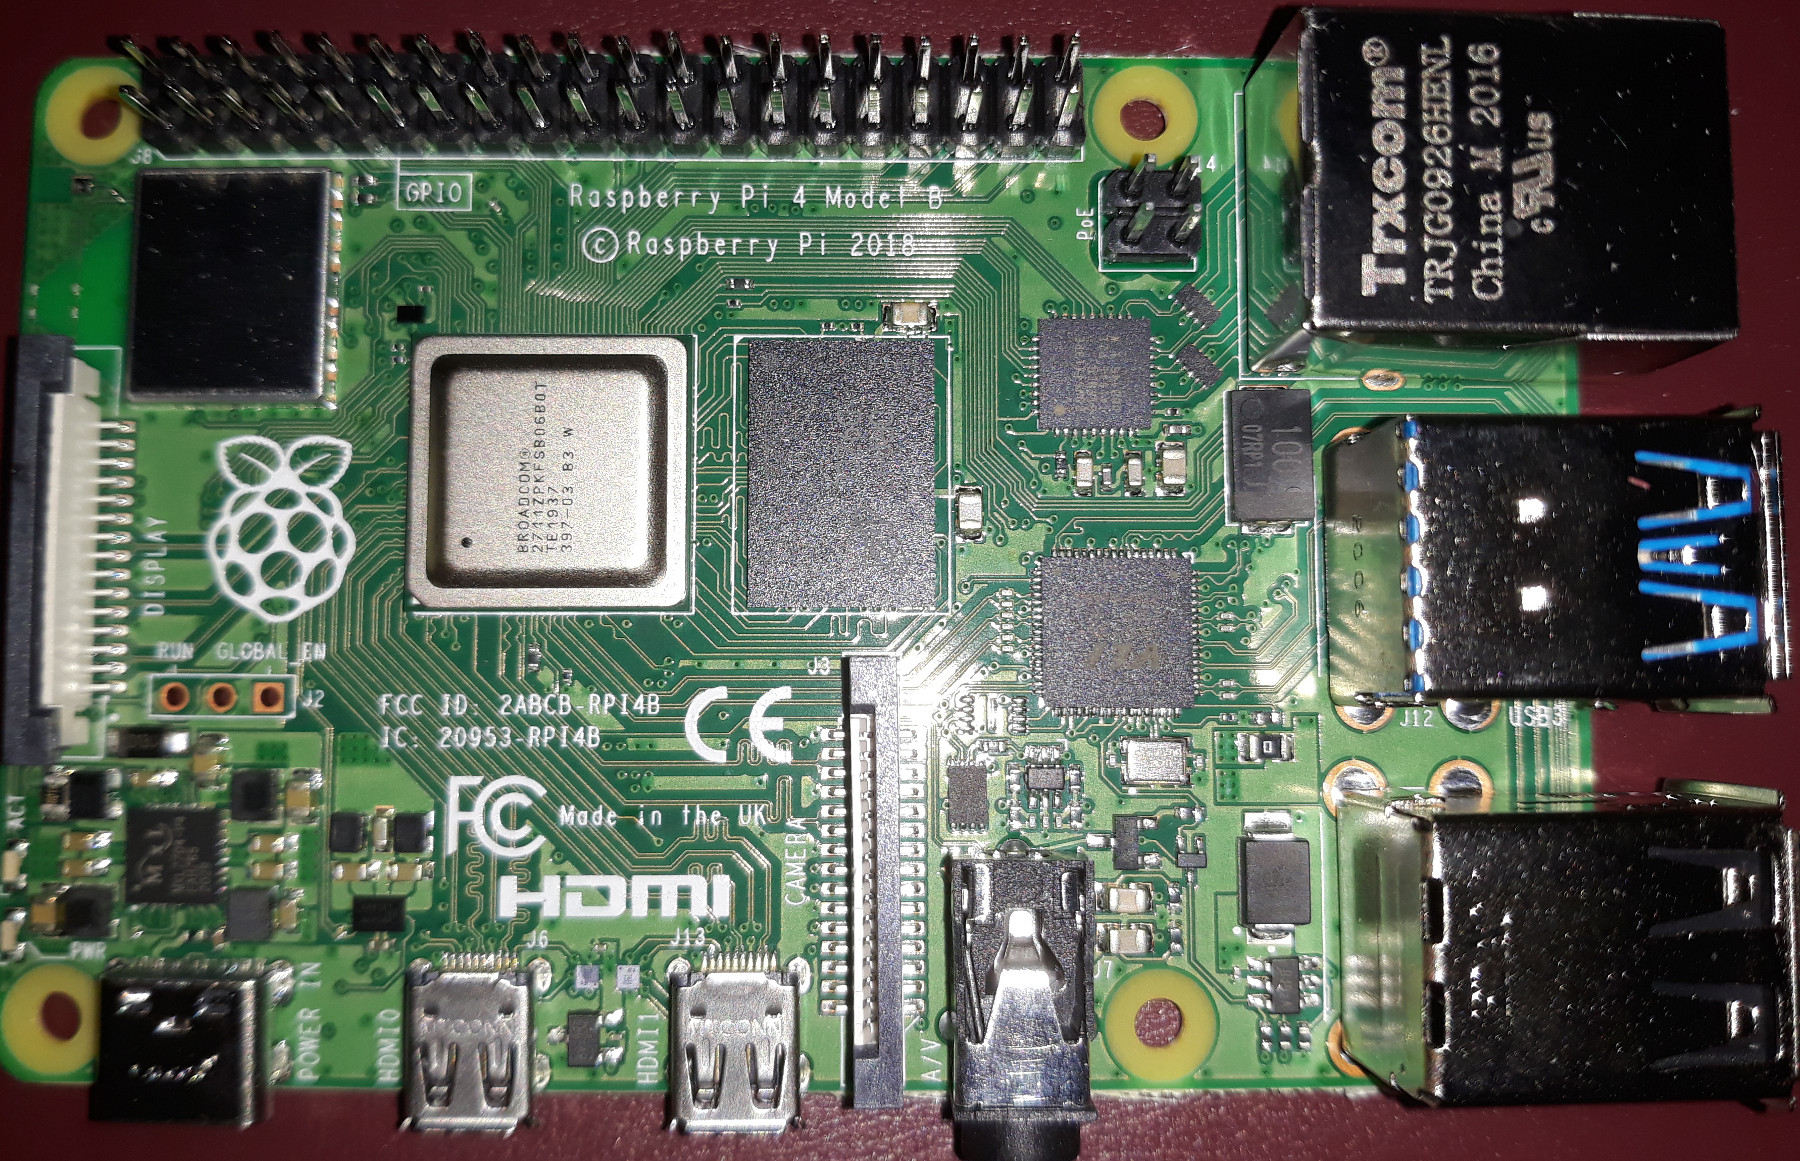
Raspberry Pi 4:
 The following instructions load each element separately - so I can monitor the progress, and make corrections.
STEP 1. Set up a new Raspberry Pi 4 with OS:
This section describes the steps in setting up a new Raspberry PI 4.
- Home Assistamt provides its' own Operating System image
on Install Home Assistant
- Go to the download page at
"Home Assistant Images" (select the correct image)
- In this case it is "Raspberry Pi 4 Model B (1 GB, 2 GB, 4 GB and 8 GB model") 64-bit
- ...
- Download "hassos_rpi4-64-4.16.img.gz" zipped file.
- .... Note where the File ( eg: "hassos_rpi4-64-4.16.img.gz") is downloaded to
- .... - usually the 'Downloads' directory - leave it 'zipped' for now.
- ...
- Insert and Format your microSD card to FAT32
- Download the Image Writer Program 'Etcher' from Etcher
- .... - (Ensure it is the correct Version for your 'Operating System' )
- Choose 'Save File'.
- ...
- .... Locate where this File is downloaded to (usually 'Downloads' directory)
- Create a working directory (eg. "G:\Raspberry-Pi 4") and drag both the files there.
- ...
- Double click the 'Etcher-Setup-xxx' application - it will install and run immediately.
- In the 'Etcher' box click 'Select image' - choose eg. "hassos_rpi4-64-4.16.img.gz"
- In the 'Etcher' box (confirm the SD drive info) and click 'Flash'.
- ... wait for it to complete 'de-compression', 'flashing', and complete the 100% 'verify'.
- Get Advanced IP Scanner from ....
"Advanced IP Scanner" and iInstall it.
- ...
- 'Insert' this new Software microSD card.to the Raspberry Pi..
-
- Power up, and wait for boot-up completion...
- Run "Advanced IP Scanner" and keep scanning until you see "homeassistant" in the names
- ..

- ..
- In my case the IP address for 'homeassistant' was 192.168.1.73
- In a browser keep trying to connect to ' http://192.168.1.73:8123 ' [Use your IP address]
- ..
-

- Create a login Username, and Password, and fill in the the next few pages to set your location etc.
- ..
- If you want to shutdown select 'Supervisor' in the left hand menu.
- The select 'System' from the top Tab. You can the click on 'Shutdown Host'
- you will have to wait about 3 minutes before you can power down.
- ..
-
Step 2. Configuration of a Static IP Address
The following Instructions have been copied, with thanks, from "Christopher David's" site Hassio Setup
Therefore we set the IP address for HASS.io to static by creating a configuration USB stick that is connected to the Raspberry Pi.
This field should not be here
 .
.
|
Format the USB
.
The USB stick has to be formatted as FAT32 and called "CONFIG", as you see in the attached picture.
After the 'Format' is completed select the USB stick in the 'File Explorer'
|
|
|
Add a directory folder to the USB Stick
.
Create a new folder (right click the mouse and select 'New->Folder') on the
newly formatted USB stick and edit the name to be name "network".
.
|

|
|
|
.
Open a blank file in 'Notepad' and copy and paste the following text to the file.
Save the file as "network.txt, and afterwards in the file manager delete the "txt" extension.
Enter the window command to "eject" the USB disk,and wait for completion.
- Open the "home assistant" console and under "Supervisor → System →" click on the three dots
- at the bottom of the Host System panel - you will see two options 'hardware' and 'import from USB'
-

-
- Click on 'Import from USB' and after a few seconds press the "REBOOT' command.
-
- Change the address in the web browser to the new IP address.
- keep refreshing until the login page appears.
-
-
- For step by step instructions refer to Home Assistance Next Steps
-
-
-
-
STEP 3. Install "Home Assistant Google Drive Backup Repository"
- First you must set the main user to have "Advanced Mode" access, or some items in the 'Add-on Store' will be hidden.
- Click on your user name and ensure the "Advanced Mode" switch is 'On'
- It is best if you restart the core to ensure it is accepted 'Supervisor->System->RESTART CORE'
-
- See Youtube video Home Assistant Google Drive Backup Repository
- Following notes are from the Github instructions
-
- The add-on is installed like any other.
-
- Navigate in your 'Home Assistant' menu to 'Supervisor -> Add-on Store'.
-
- Click '3-dots' menu at upper right corner and selecting 'Repositories' and add this repository by filling in the URL:
https://github.com/sabeechen/hassio-google-drive-backup
-
- The google-drive-backup is displayed in a list with several other items
- DO NOT DELETE ANYTHING ELSE FROM THE LIST
- close this window
-
- Click on 'INSTALL'
- Turn on: 'Start on boot', 'watchdog', 'auto update', and 'show in sidebar'
- Click on 'START'
-
- Go to 'Snapshots' in the sidebar and "AUTHENTICATE WITH GOOGLE DRIVE".
- log into Google drive and allow all the questions. When you are shown a 'Key' copy it and paste it back to Home Asiistant.
STEP 4. Setting up other important Integrations.
- Include 'File Editor' Integration.
- Set 'Start on boot', 'Watchdog', 'auto update', and 'Show in sidebar'
- Then Click 'Start'
-
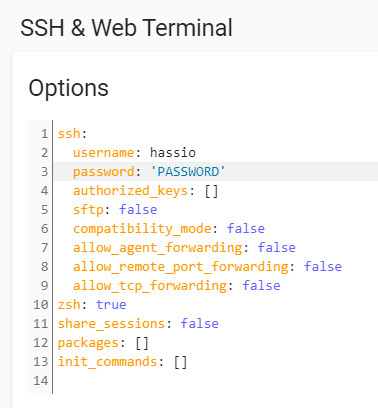
- Include 'SSH & Web Terminal' Integration.
- Set 'Start on boot', 'Watchdog', 'auto update', and 'Show in sidebar'
- Then Click 'Start'
-
- Click on "Supervisor' -> 'SSH & Web Terminal' and then on the 'Configuration' top tab
- Now you must create a login username and Password in the configuration file. Replace 'PASSWORD' with your own.
- Do not use an over-simplistic password or it will be rejected later - must have upper/lower case, and numerals
-
- After you change the configuration you must click 'SAVE' and when it exits 'RESTART'
-
- Test the SSH connection by making an SSH PTTY connection to 192.168.1.21 using Port 22
- Say 'Yes' to the Certificate.
-
- Force a Snapshot...Click on 'Snapshots'
- Under the top Tab 'Actions' click on '+snapshot now'
and enter 'After File Editor and Terminal-SSH addon - (date)'
- Tick the box 'Keep Indefinitely on Google Drive' and 'CREATE SNAPSHOT'
-
STEP 5. Setting up SAMBA file sharing.
-
- Watch this Youtube video
"How to enable Samba in Home Assistant and access your files in your network."
- Go to "Supervisor->add-on store" and click on "Samba Share"
- Then Click 'INSTALL'
- Set 'Start on boot', 'Watchdog', and 'auto update'
- Do not click on 'Start' yet - you must do 'Configuration' first

-
- Click on 'Configuration' and change to match the following.
- The password must be entered in single quotes ('PASSWORD') otherwise SAVE will fail
----( apparently due to a small bug in Hass )
- Do not use an over-simplistic password or it will be rejected later - must have upper/lower case, and numerals
-
- The 'IP address' must be changed to 192.168.1.0/16 to allow access through our local ethernet network.
- If asked "RESTART", otherwise select 'Info' tab and click "RESTART"
-

-
-
Opening the shared directories in Windows- ...Don't forget - The HOMEASSISTANT username/password is 'homeassistant / PASSWORD'.
- ...If it prompts for user=admin click on the 'other user' box at the bottom of the box.
- .Open a File Explorer Window...
- ..Type '\\192.168.1.21' [or '\\homeassistant'] in the top box....
- ...After logging in you will see the six 'Shared directories"...
-

-
- Force a Snapshot...Click on 'Snapshots'
- Under the top Tab 'Actions' click on '+snapshot now' and enter 'After SAMBA Install (date)'
- Tick the box 'Keep Indefinitely on Google Drive' and 'CREATE SNAPSHOT'
-
-
STEP 6. Adding Mosquitto to Home Assistant:
- Open the console page 'Supervisor' -> 'Add-OnStore'
- Go to ' Mosquitto Broker' , click on it and 'INSTALL'
- Set 'Start on boot', 'Watchdog', and 'auto update'
- Don't click 'START' until the configuration files are updated/li>
.
- In Samba - go to the 'share' directory
- Create a new directory in 'share' and name it 'mosquitto'
- Move to that new empty 'mosquitto' directory
- Open a blank file in 'Notepad' and copy and paste the following text to the file.
- Save the file as 'accesscontrollist.txt', and afterwards in the file manager delete the 'txt' extension.
- Ignore the warning about making the file unusable!
- Open a blank file in 'Notepad' and copy and paste the following text to the file.
- In the same 'mosquitto' directory - save the file as 'acl.conf'
- The following image shows the file structure...

-
- 'Restart' the Mosquitto Broker, click on the MQTT Integration, and go to the top 'Configuration' tab
- Now you need to set the "active:" parameter to "true". (this cannot be done until after the config files are loaded).
- 'SAVE' the configuration and 'Restart' the Mosquitto Broker
-

-
- Force a Snapshot...Click on 'Snapshots'
- Under the top Tab 'Actions' click on '+snapshot now' and enter 'After MOSQUITTO Install (date)'
- Tick the box 'Keep Indefinitely on Google Drive' and 'CREATE SNAPSHOT'
-
-
To test mosquitto you need to be able to "Publish" messages and also to Subscribe (and view) the messages.
Google Chrome supports an Add-On that will show MQTT Messages. (This works well).
-
- You can now test whether the Mosquitto service is working
- If you Raspberry Pi is set to 192.168.1.21 then use that IP Address when setting a 'Connection'
-
A important tool for testing Mosquitto and MQTT is MQTT SPY which can be installed on a Windows Desktop Computer.
It is quite powerful but requires that a recent version of Java be installed and active.
.
Setting the Connection Details in "mqqt-spy" for Raspberry Pi:
...

|
Subscribing to MQTT messages
.
Once connected you should Subscribe to "#" (means 'all' messages).
.
You will then see any 'Subscribed Messages' appear in the lower box.
.
You can confirm it by typing anything into the "Publish Message" "Topic"
and "Data" box and press "Publish".
If 'Mosquitto' is working on the Raspberry Pi the text should
appear in the "Messages" window.
|

|
|
- If you have not made any IOT sensors yet, then this is the exact point where you should make an ESP8266 sensor.
- I would recommend not trying to setup the rest of Open Assistant, until you are able to see MQTT messages appearing in this window.
- MQTT-Sender Making an ESP8266 MQTT Sender
STEP 7. Install ESPHome
- INSTALL ESPHome
- Go to "Supervisor->add-on store" and click on "ESPHome"
- Then Click 'INSTALL'
- Set 'Start on boot', 'Watchdog', 'auto update', and 'Show in sidebar'
-
- Click on the 'three dots' at the top right corner of the screen.
- Then from the drop down list click on the 'Secrets Editor'
-
- In the blank 'secrets.yaml' file copy the text below and paste into.
- Replace the YOUR-SSID, WIFI-PASSWORD, and OTA-PASSORD with your own text (no surrounding quotes required).
-
-
- Click on 'SAVE'
- These 'Secret' passwords are automatically inserted into the main yaml file after '!secret'
-
-
- Click on the Green (+) at the bottom right to create your first device
-
- Once Installed the 'yaml' file may appear empty. Select 'Overview' and then return to 'ESPHome'
-
-
- Click on 'SAVE'
-
- Plug your ESP device into the USB port of the Home Assistant.
- From the drop down list at the top right select the USB port (eg:/dev/ttyUSB0 (FT232R USB UART))
- Set the ESP to programming mode (short GPI00 to ground and do Reset)
- Click on 'UPLOAD'
-
-
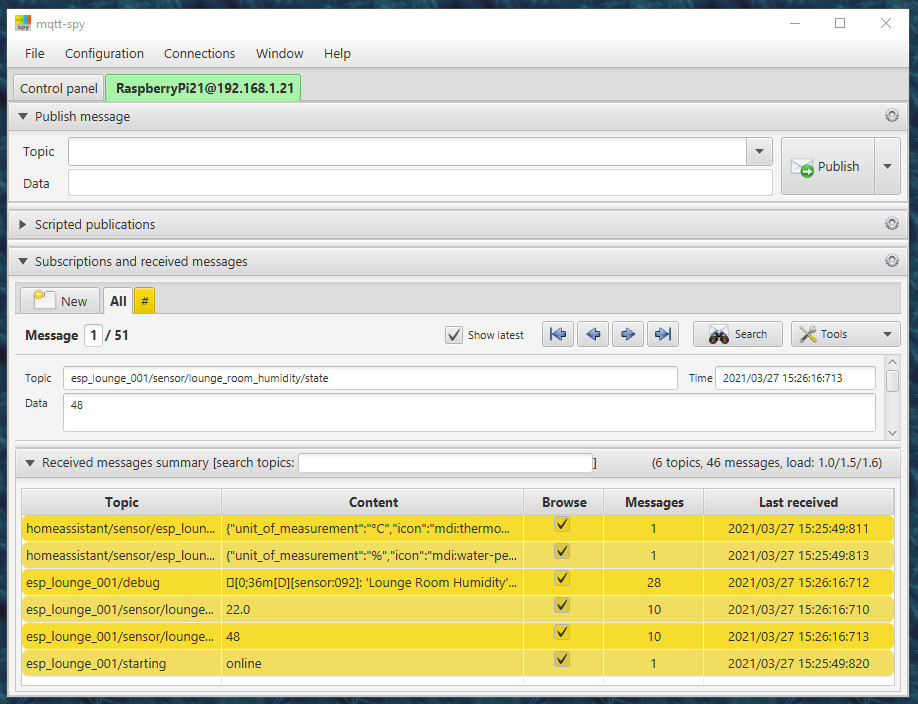
Checking the MQTT Messages using "mqqt-spy"
- This is what I see when I subscribe to all (#)
-
......
-
- A 'json' string is sent at startup for both the Temperature and Humidity values - The actual values are sent at the specified rate.
- Both the Topic and Contents are very hard to read - the Temperature data are shown in the following text.
-
- This 'json' string is required by Home Assistant to decode and format the data coming from the ESP
-
- Home Assistant has several 'yaml' configuration files in the '/config/esphome/' folder.
 .
.
|
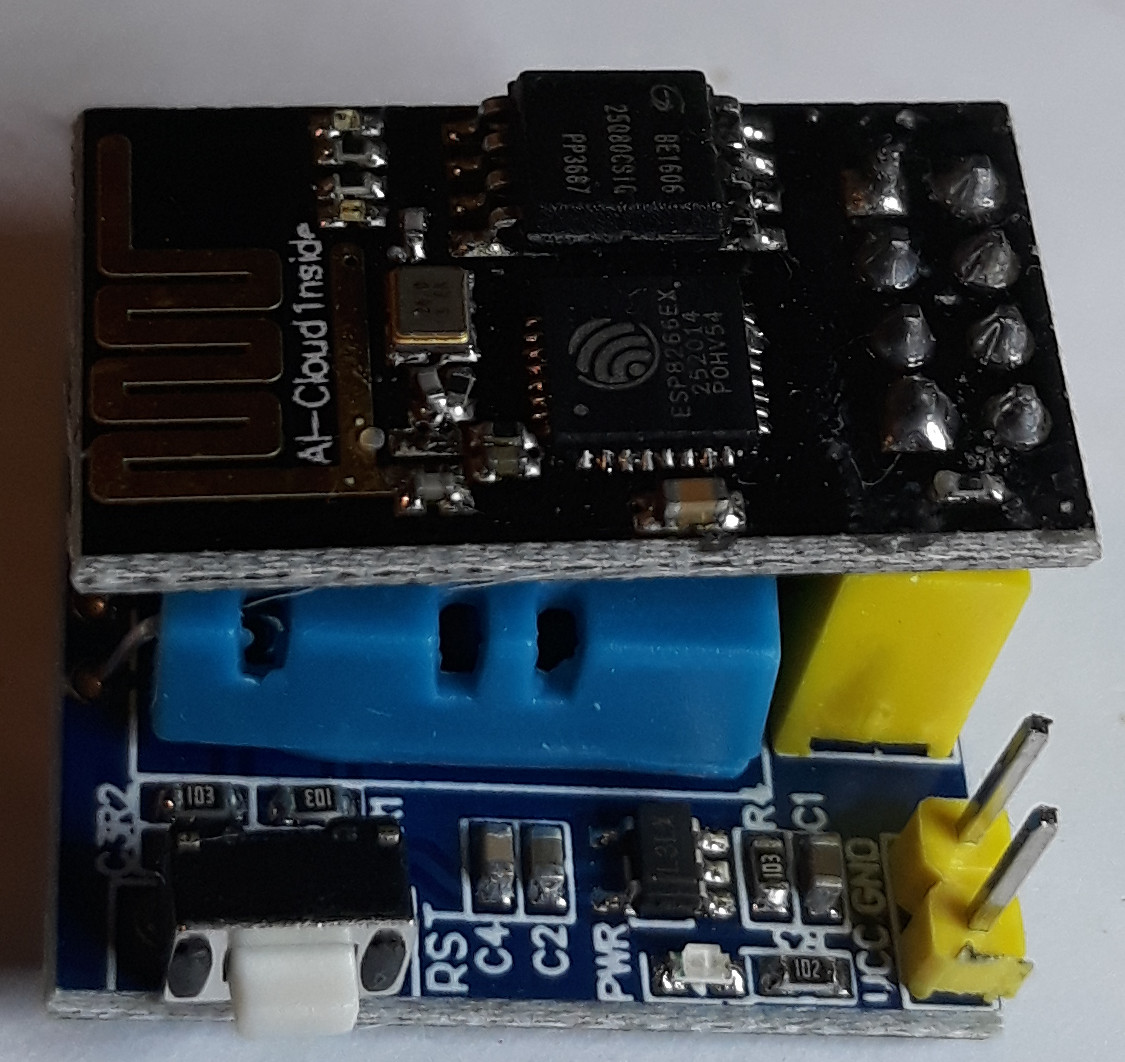
Simple ESP-01S and DHT11 Module
.
This very useful module combines an ESP-01S and a DHT-11 Temperature and Humidity Sensor.
It has the advantage of being readily available on ebay and even from some local Australian suppliers
.
I purchased mine on ebay from 'lonelybinary' at $30.00 for three, but you can get the
same modules from China for about $5.72 each plus postage.
Current ebay listing ESP-01S ESP-01 WIFI DHT11 Temperature Humidity Sensor
.
|
|
|
Modifying the DHT11 module to reduce heating
.
The main disadvantage is the close proximity of the DHT11 to the ESP-01S.
.
This could cause heating if the transmit (70ma) sequence happens too often.
For this reason the module was set to only report reading each 10 seconds
In the first attempt to use one of these modules the temperature gradually rose until it was about 10 degrees too high.
. .
The heat was actually coming from the lower board - not the ESP01.
The solution was to gently bend the DHT11 module back so that it was well
clear of the base board, and the regulator chip - giving much improved accuracy.
|

|
|
.
 .
.
|
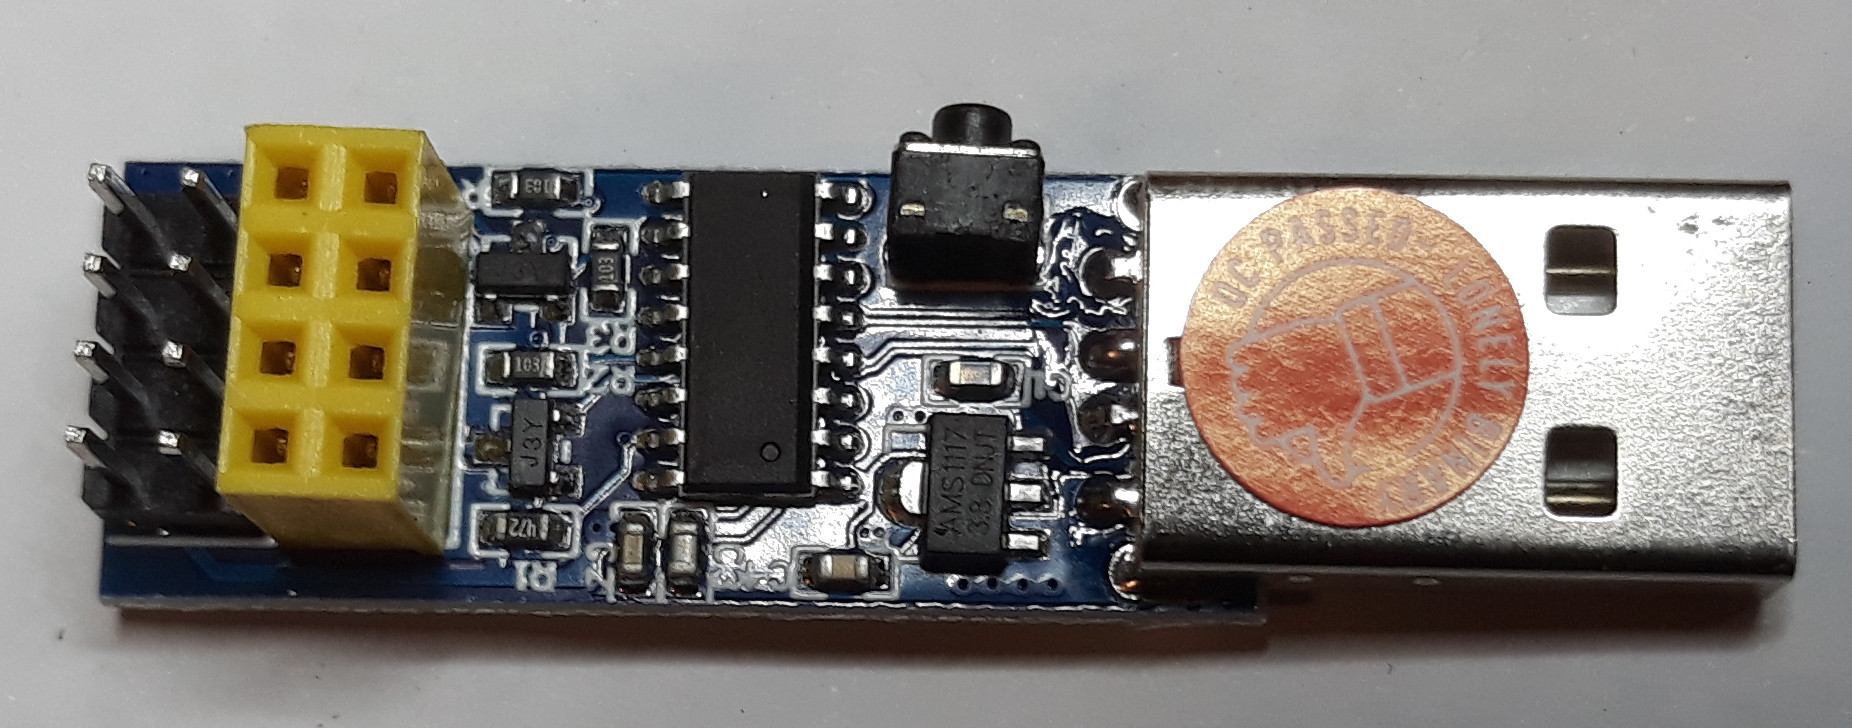
Programming the ESP-01S
.
To program the above module you will need one of these (or similar) USB - ESP-01 programmers.
.
These simply plug into the Raspbrry Pi and the ESP-01 plugs into this module.
.
When you are ready to program the ESP-01s you press and hold the 'small button'
- just before you begin the 'upload'.
.
|
|
Setup the first ESP-DHT11 Module - Outdoor
- Go to "ESPHome" in the sidebar
-
- Click on the 'three dots' at the top right corner of the screen.
- Then from the drop down list click on the 'Secrets Editor'
-
- In the blank 'secrets.yaml' file copy the text below and paste into.
- Replace the YOUR-SSID, WIFI-PASSWORD, and OTA-PASSORD with your own text (no surrounding quotes required).
-
-
- Click on 'SAVE'
- These 'Secret' passwords are automatically inserted into the main yaml file after '!secret'
-
-
- Click on the Green (+) at the bottom right to create your first device
- Enter the name 'esp_outdoor_199'
- Select 'Generic ESP8266 (for example Sonoff)'
- This can be changed to 'board: esp01' 'when the 'esp_outdoor_199.yaml' file is updated
-
- Once Installed the 'yaml' file may appear empty. Select 'Overview' and then return to 'ESPHome'
-
-
- Click on 'SAVE'
-
- Plug your ESP device into the USB port of the Home Assistant.
- From the drop down list at the top right select the USB port (eg:/dev/ttyUSB0 (FT232R USB UART))
- Set the ESP to programming mode (short GPI00 to ground and do Reset)
- Click on 'UPLOAD'
-
-
.
.
STEP 8. Install HACS
- INSTALL HACS
- Open 'HACS'
- Click on 'Installation'
- Follow each of the steps
- follow 'Home Assistant Supervised'
- Open a terminal and run the HACS install script
- wget -q -O - https://install.hacs.xyz | bash -
- Note message: "Remember to restart Home Assistant before you configure it"
- See Youtube video Install HACS in Home Assistant
-
- Go to 'Configurations' -> 'Server Controls'
- Then click on 'CHECK CONFIGURATION' and observe 'Configuration valid!
- Then under 'Server Management' click on 'RESTART' followed by OK - then wait!
- Now you must clear your browser cache.
- In Chrome: click on the three dots in the top right corner, then select 'More Tools' followed by "Clear browsing data"
- In the dialoge box, tick only the bottom option 'Cached images and files'
- Click the 'Clear data' box
-
- Go to Configuration -> Integrations
- Click '+ ADD INTEGRATION' button
- In the search line at the type 'HACS'
- Click on 'HACS' and wait while it is installed.
- The installation will display a list of four acknowledgement options. You must tick all and 'SUBMIT'
- The system will display a box 'Waiting for device activation' which has an 8 character code at the bottom.
- WRITE DOWN THIS CODE - YOU WILL NEED IT SHORTLY
- Click on the URL link and wait for the 'code' to be requested - enter it!.
- You then have to 'Authorize hacs' for access.
- The HACS Integration should then appear in your Configuration Page
-
- Force a Snapshot...Click on 'Snapshots'
- Under the top Tab 'Actions' click on '+snapshot now' and enter 'After HACS Install (date)'
- Tick the box 'Keep Indefinitely on Google Drive' and 'CREATE SNAPSHOT'
-
- Now we can set the options for 'HACS'.
- In Configuration -> Integrations view the HACS Integration and click on 'OPTIONS'
- Enable the top three options, but don't tick 'Enable experimental feature'
-
- Go to 'Configurations' -> 'Server Controls'
- Then click on 'CHECK CONFIGURATION' and observe 'Configuration valid!
- Then under 'Server Management' click on 'RESTART' followed by OK - then wait!
-
-
-
-
Setting up the display windows for "Reolink" cameras:
Go to 'Overview' display.
Click in the '3 dots' in the top right corner and select 'Edit Dashboard'
Then go to the '+ADD CARD' and choose a 'Picture Glance' Card
In the 'Picture Glance Card Configuration' go to the bottom and click on 'SHOW CARD EDITOR'
Remove any text in the window and paste the following into the Window. Ensure you replace 'PASSWORD' with the one you chose.
...

|
Home Assistant overview
.
.
STEP 9. Add extra Devices tp ESPHome
Setup the Second ESP-DHT11 Module - Office
Go to "ESPHome" in the sidebar
Presuming that the 'Secrets.yaml' file has been been filled in with the SSID, wifi Password, and OTA_Passwrod.
Click on the Green (+) at the bottom right to create your nest ESP-01 Sensor device
Name the new device 'esp_outdoor_199'
Set the device type to "Generic ESP8266 (for example Sonnof)"
Enter the wifi SSID for your own network
Enter the wifi Password for your own network
Enter the OTA Password that you want to use.
Then click 'submit'
Once On Instalation the 'yaml' file may appear empty. Select 'Overview' and then return to 'ESPHome'
Go to the box 'esp_office_197' and click on the 'EDIT' command at the bottom left.
Delete any previous contents and replace with the following text.
Click on 'SAVE'
When saved click on 'VALIDATE' to check the code.
Insert a new ESP-01S into the USB programming adapter.
Plug that programming adapter into the USB port of the Home Assistant.
From the drop down list at the top right select the USB port (eg:/dev/ttyUSB0 (FT232R USB UART))
Set the ESP to programming mode (short GPI00 to ground and do Reset)
Click on 'UPLOAD'
Force a Snapshot...Click on 'Snapshots'
Under the top Tab 'Actions' click on '+snapshot now' and enter 'After ESP_Office_197 (date)'
Tick the box 'Keep Indefinitely on Google Drive' and 'CREATE SNAPSHOT'
Setup the First esp_relay_190 module
 .
.
|
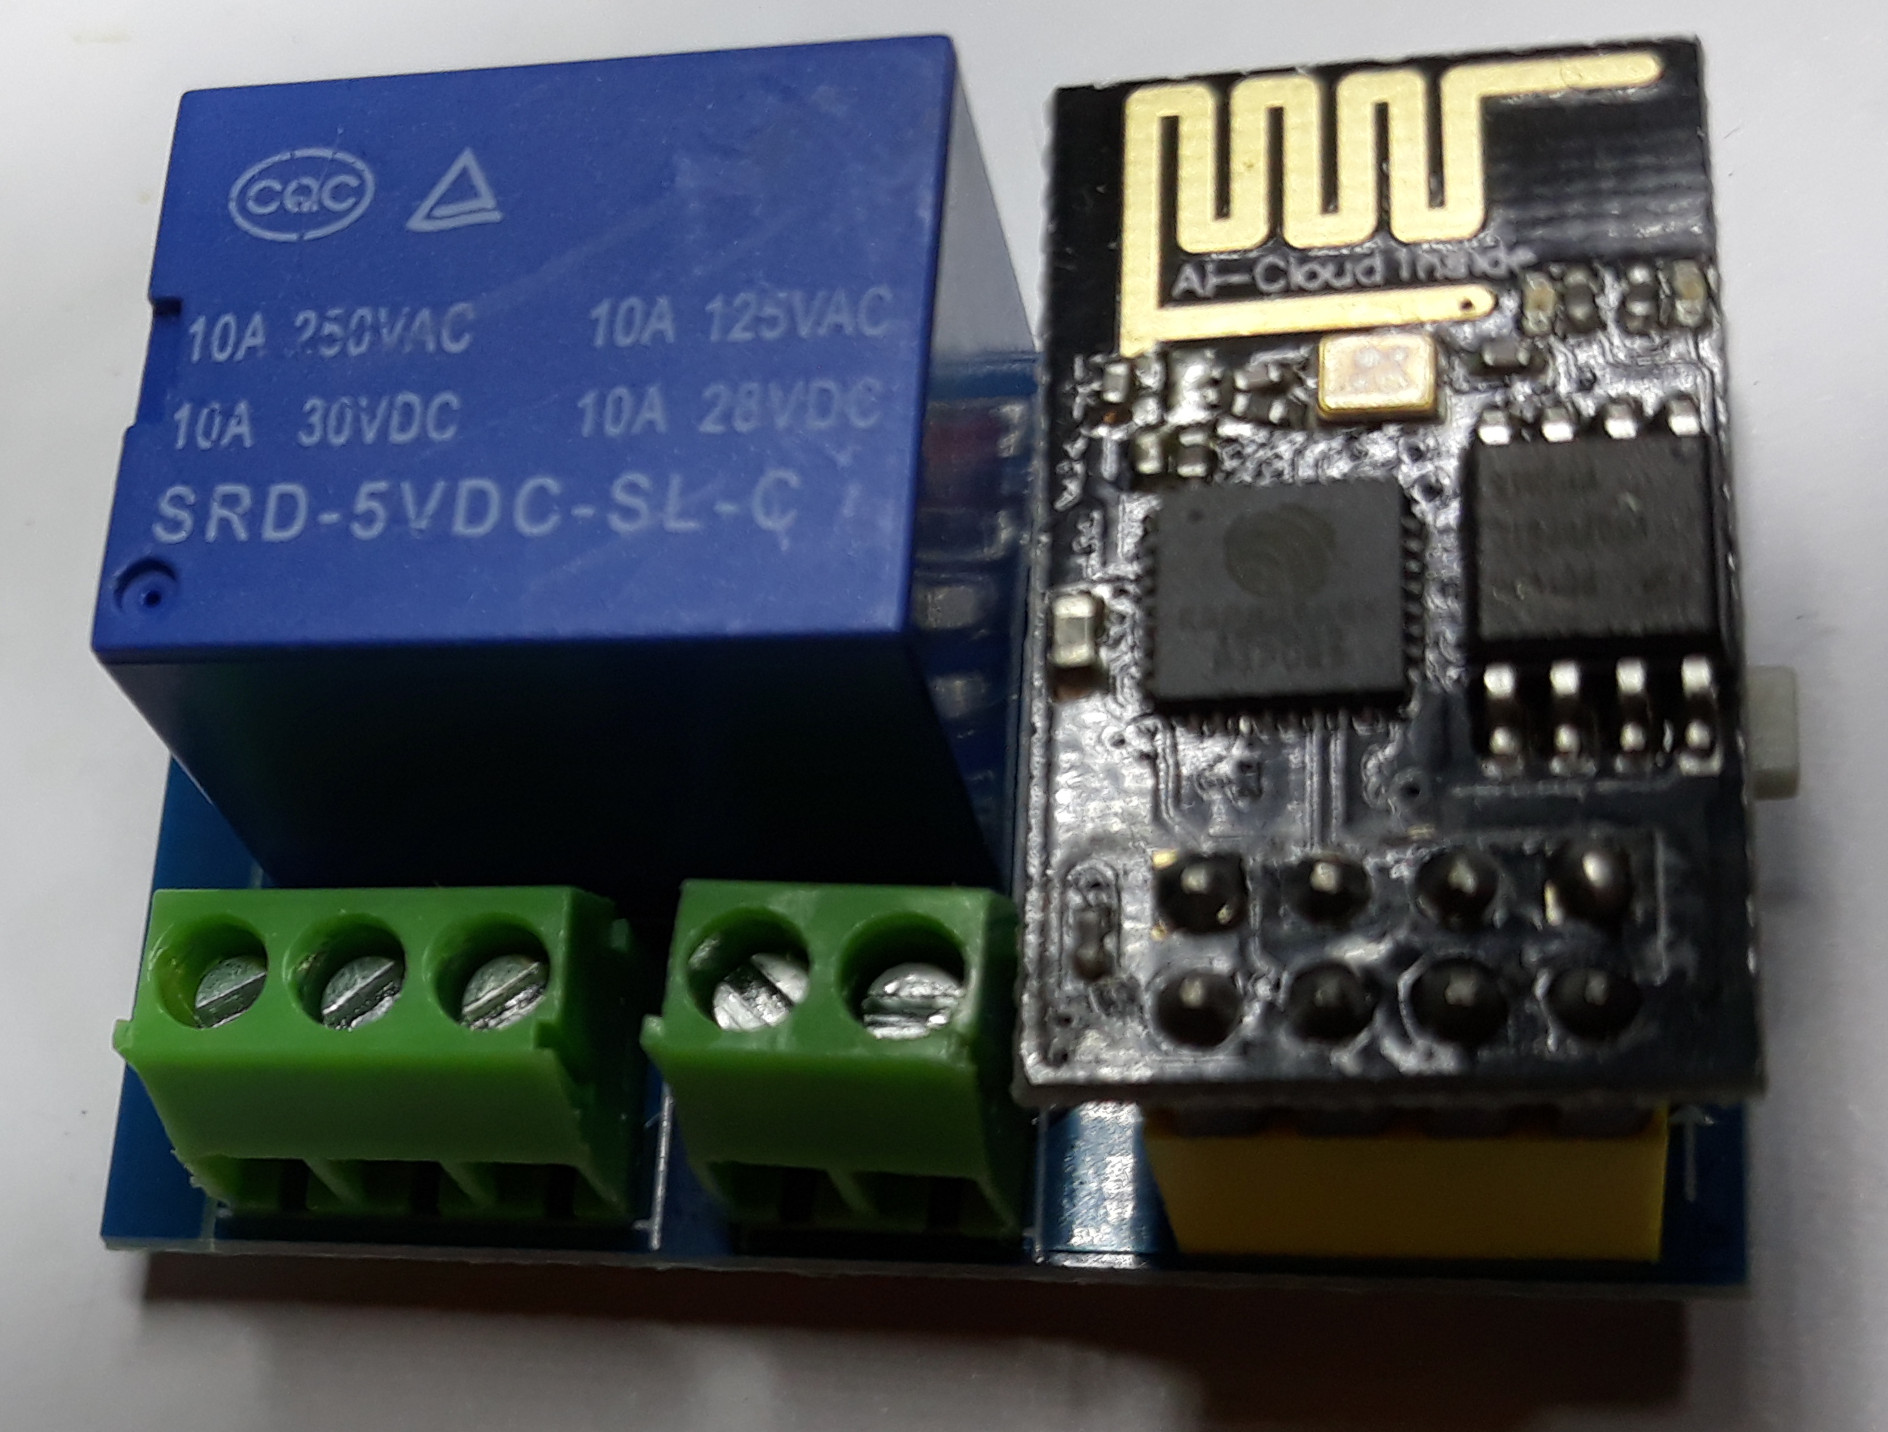
ESP-01S Single Rely Module
.
.
.
This module runs from a 5 Volt supply and contains an on board regulator to provide the 3.3 Volt needed by the ESP01.
.
After the ESP01 is programmed by the Raspbrry Pi, it can be plugged into this module.
.
Press the 'Reset Switch if it does not connect first time.
.
|
|
Setup the First esp_relay_190 module
Go to "ESPHome" in the sidebar
Presuming that the 'Secrets.yaml' file has been been filled in with the SSID, wifi Password, and OTA_Passwrod.
Click on the Green (+) at the bottom right to create your nest ESP-01 Sensor device
Name the new device 'esp_relay_190'
Set the device type to "Generic ESP8266 (for example Sonnof)"
Enter the wifi SSID for your own network
Enter the wifi Password for your own network
Enter the OTA Password that you want to use.
Then click 'submit'
Once On Instalation the 'yaml' file may appear empty. Select 'Overview' and then return to 'ESPHome'
Go to the box 'esp_relay_190' and click on the 'EDIT' command at the bottom left.
Delete any previous contents and replace with the following text.
Click on the Green (+) at the bottom right to create your first device
Enter the name 'esp_relay_190'
Select 'Generic ESP8266 (for example Sonoff)'
This can be changed to 'board: esp01' 'when the 'esp_relay_190' files is updated
Once Installed the 'yaml' file may appear empty. Select 'Overview' and then return to 'ESPHome'
Click on 'SAVE'
Plug your ESP device into the USB port of the Home Assistant.
From the drop down list at the top right select the USB port (eg:/dev/ttyUSB0 (FT232R USB UART))
Set the ESP to programming mode (short GPI00 to ground and do Reset)
Click on 'UPLOAD'
Force a Snapshot...Click on 'Snapshots'
Under the top Tab 'Actions' click on '+snapshot now' and enter 'After ESP_Relay_190 (date)'
Tick the box 'Keep Indefinitely on Google Drive' and 'CREATE SNAPSHOT'
VERY IMPORTANT HINT:
To ensure that the 'Overview' page recognizes new changes, you need to do two steps...
Select 'Configurations' in the left hand panel.
On that page Scroll down to 'Server Controls'and click on '>'
NOTE: IF YOU DON"T HAVE THAT IN YOUR LIST ON THE RIGHT YOU MAY HAVE TO CHANGE
YOUR USER SETTINGS BY CLICKING ON 'ADVANCED MODE'. You may need to turn it on
and off several times to ensure that you have "ADVANCED PRIVILEGES"
First: on the 'Server Controls Page' click the 'CHECK CONFIGURATION' Button
Second: under 'Server Management' you must click on RESTART
- then answer 'OK' and wait for the Server to be restarted.
.
.
General Raspberry Pi Linux Commands and Hints:
This section Lists the useful Linux Commands that I often forget.
... Report on Free Space on the SD Card ...
df -Bm
... Clear the Putty screen ...
clear
... update your distribution ...
sudo apt-get update
... To totally shutdown Raspberry Pi...
sudo shutdown -h now
... check up on Mosquitto (MQTT Broker) ...
service mosquitto status
netstat -tln
mysql -p -u openhab
show databases;
use openhab;
SHOW COLUMNS FROM Item1;
show tables in openhab;
SHOW TABLE STATUS FROM db_name;
quit;
Last updated: 05-AUG-2023 9:44AM.
|
|
| |

